
There is a lot to keep in mind when setting up a new training program. Subject matter experts may want to delve deep into a technical topic. The client might be confused as to what, exactly, they want participants to learn.
Course builders will have questions on graphic design and styles. Learners will need clear, fool-proof instructions to navigate the learning management system. And you, working as an educator, corporate trainer, elearning course builder, or learning designer, need to make sense of it all.
This is where the ADDIE model comes into play. The ADDIE process is a time-tested model that will help you conceptualize and make sense of the steps needed to create an engaging learning experience that achieves your desired outcomes.
Join the 150,000+ facilitators using SessionLab.
Let’s delve into what ADDIE is, how it works, and how you can quickly start using it to organize your instructional design workflow. In this article, we’ll look into:
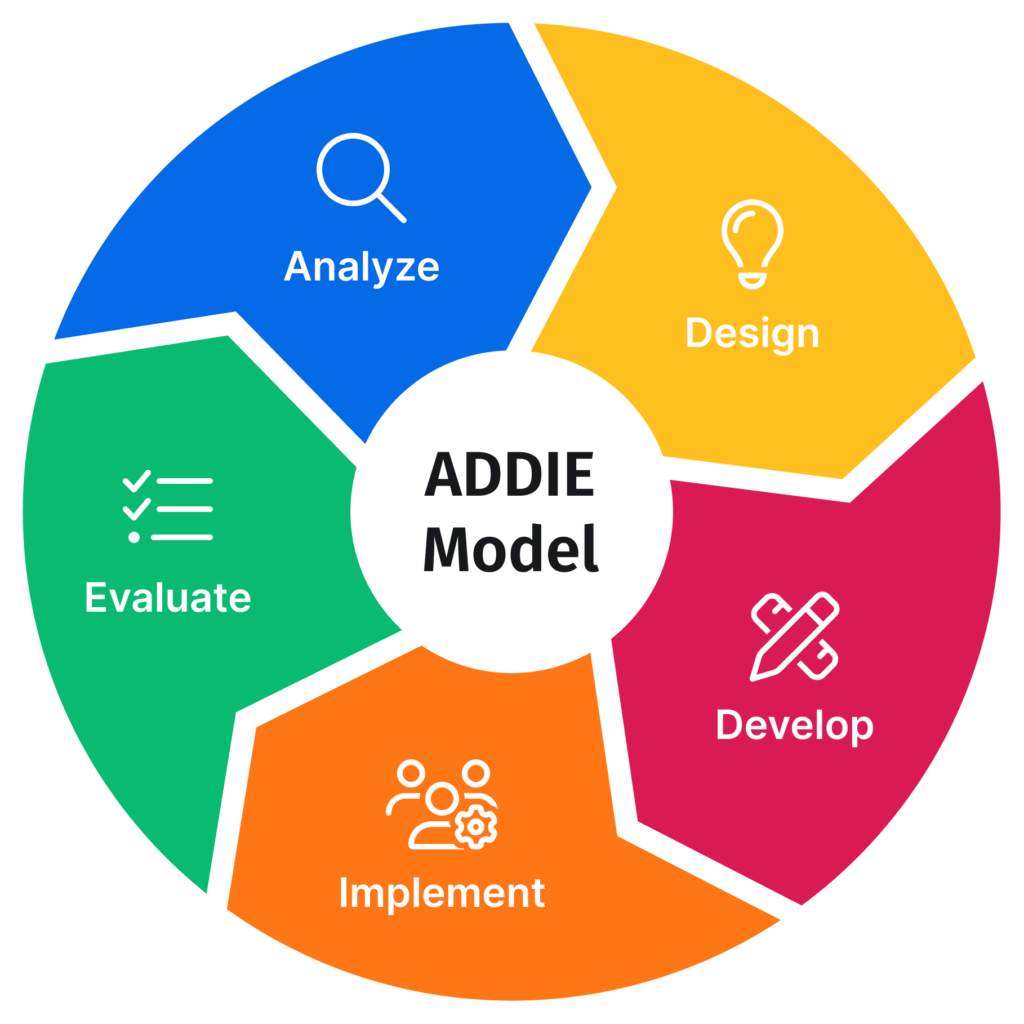
The ADDIE model is a versatile and practical framework that covers all the steps of the instructional design process. The word is an acronym to help you remember all you need to do for the Analysis, Design, Development, Implementation, and Evaluation of a training program.
What may sound like common sense (“Well of course I need to analyze needs before designing!”) does tend to get lost when we are busy and under pressure to deliver. Evaluation, for example, might be forgotten in the mire of to-do lists and content provider email exchanges.
So keep the ADDIE model by your side (we’ve made a nice visual you can print out!) to make sure you always include all these important elements:
By following the ADDIE model, you ensure coherence, effectiveness, and a good dose of efficiency in your instructional design workflow.
Florida State University initially developed the ADDIE framework in 1975 as part of its instructional theories for military training. From the very first definition, it acknowledged that the rather universal division in steps can be applied to any curriculum development activity. In fact, it’s not different from any step-by-step approach to project design and implementation.
When working to write this very article, for example, I had to first think about what readers might need to know (Analyze), then I created a high-level plan for my article, consisting of all the titles and subtitles (Design). I then went on to research and write out each paragraph (Develop) and move it to publication, adding some visuals and links (Implementation).
If I’m smart about it, I’ll check how the article is doing in a few weeks (Evaluation) and see if I need to make any changes to make it clearer or more engaging.
You can go through the same steps for any project. Friends are coming to dinner! To decide what to serve, you’ll think about their tastes, allergies, and preferences (Analyze). You’ll make a list of dishes and consider how to serve them (Design). Next comes shopping and cooking (Develop). You know what Implementation is like. And you might get some Evaluation at the end of the meal, hopefully positive!
ADDIE is a common-sense framework, yet this doesnt take away any of its import. It is a flexible guideline, easy to remember. Use it and it will quickly become second nature.
The original 1970s model had many more steps, but it was systematized in the 1980s. It’s the most commonly used model today, with some competition from Rapid Prototyping, which is essentially a variation of ADDIE where more short-term iterations are run in quick succession.
Rapid prototyping, with its focus on speed and less attention to completion and polish, might work well for you if you are short on time and plan future re-runs of the same course.
The absence of a structured model in instructional design can lead to a messy process and, ultimately, disappointing learning experiences that do not match your client’s expectations.
The ADDIE model provides a scaffold for your thinking and for collaboration with the rest of your learning design team. You can use it to inform your online course storyboard and every step of the development process. Use it to ensure you don’t overlook any steps and manage the project effectively.
Here are some of the key advantages of ADDIE:
What does each step of the ADDIE model imply? In the next paragraphs, we’ll go through typical examples of actions that might take place while designing training courses with ADDIE.
The analysis phase lays the foundation for your course. Conduct a needs assessment to identify what problems your client or organization wants to solve by providing the new training course you’re tasked with designing.
What are the learning goals? Who is your target audience? What are potential learners’ skills, experiences, and barriers? What should participants be able to do or know at the end of the course? Also look at subject matter analysis: what concepts will need to be covered?
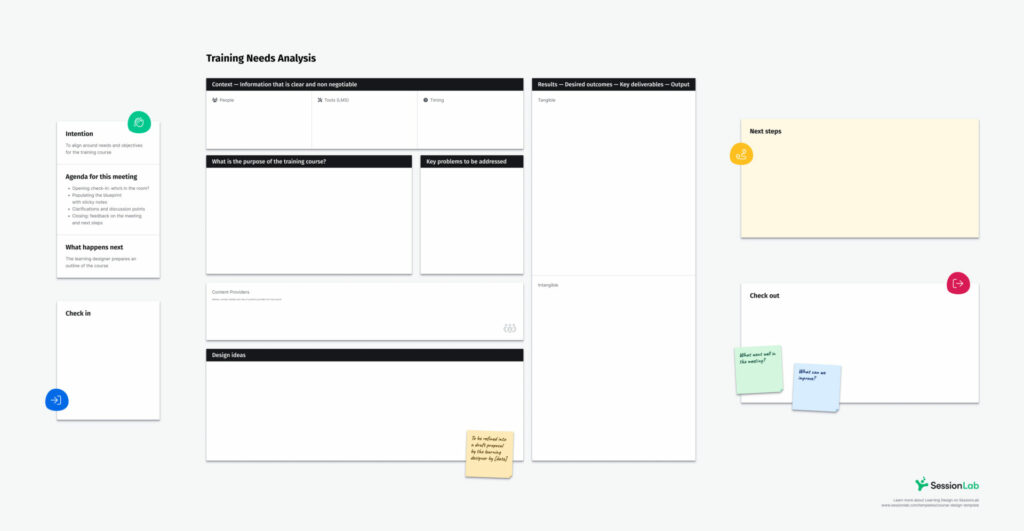
This phase is best served by organizing client calls and team meetings. In this ready-to-use canvas, you can collect essential information from your initial needs analysis. At every subsequent step, you should be designing, developing, and implementing a training program that responds directly to these needs.
It’s often the case that clients are not 100% clear about what they actually need at the very start. And it’s your job, as a learning designer, to patiently draw the information out until there is a shared understanding of the learning objectives for your course.
A common issue in the analysis stage is that clients may want to try to cram too much into a single training, so take your time analyzing needs and defining what should be covered in this course and what should be kept for a later one.
Perhaps you will see the opportunity for a more advanced version of the same training, building on existing knowledge. The output of the analysis phase is a needs assessment to feed into the design phase.
After the analysis phase is done, the next step is to create a high-level course curriculum blueprint. As courses are often modular, it could also be the design of a single module, repeated as many times as needed and sandwiched between an introduction and a final lesson and/or assignment.
In the design phase, you’ll be answering questions such as:
By considering these kinds of questions and using the information in the analysis phase, instructional designers will then create an outline designed to meet learning objectives and satisfy business needs. The design phase deals with all the items needed to get approval from a client so you can then move towards creating course material.
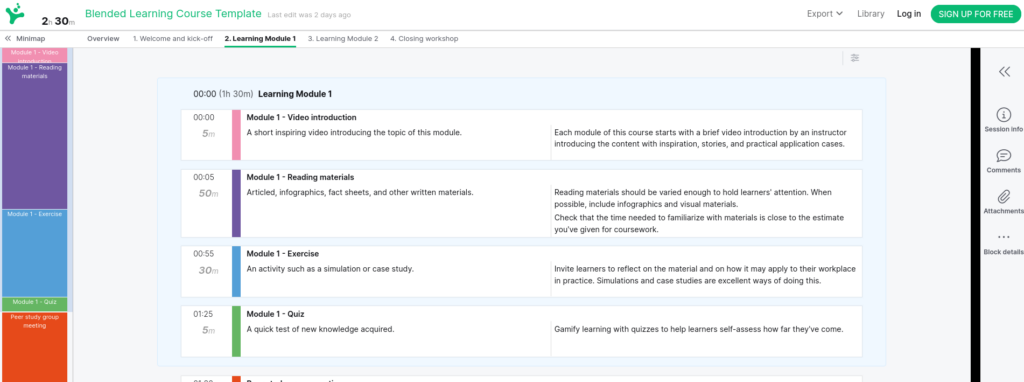
To see an example of a typical learning design blueprint, check out this template for a blended learning course, that combines self-paced and workshop elements.
SessionLab is a particularly useful tool to use at this stage of your instructional design process, as it allows you to see the entire course at a glance, color-code sections, share it with the client, and collaborate with colleagues directly.
The development phase is probably where you will spend most of your time when creating a new learning program. Once you have alignment and approval on the blueprint for your design, you’ll likely move it to a storyboarding tool and start adding content to the course.
A suite of educational technology tools can help you in the process, and for more on this check out our article on the best instructional design tools on the market.
Typical actions you’ll be taking at this stage include:
During the development phase, challenges often arise that are related more to project management than to actual learning design. It can be hard to collect all the bits and pieces you need, and make sure you get all the materials you need to build your course on time!
Mitigate these risks by taking time to carefully brief subject matter experts and the rest of your team, clarifying any questions, and setting realistic and clear deadlines!
We’ve heard from a business school learning design team that they color-code sections of their courses in a high-level SessionLab outline of the program. Different colors make it immediately evident what is done, what is missing, and where builders and training developers need to do some work.
The deadline draws near and it’s (almost) time to make your brand-new course live! Before you do that, there is a last step in the Implementation phase of the ADDIE model: pilot testing.
Testing and refining an almost-ready course rarely gets the attention (and credit) it deserves. Take some time to look at your product with fresh eyes (and a cup of tea, this will take a while). Run through the entire course as if you were a learner. Ask yourself questions such as:
Crucially, it’s important to remember that learners will never go through your materials exactly the way you imagine they will. Try “breaking” the course by following links in unexpected ways or trying to do things “wrong” (e.g. submitting assignments late, or twice). Explore the learning environment fully. Check all the links. What happens? Refine your course accordingly before training delivery begins.

At this point, most of your work is done, as attention will shift to promoting the course and student registration. Keep your inbox monitored for last-minute changes and glitches. If you’re anything like me, you’ll want to read all feedback and assignments as soon as they come in, just out of curiosity about how your course is doing!
Evaluating the effectiveness and impact of any learning intervention is a hot topic. Having the evaluation phase as the last step of the ADDIE instructional design model serves as a reminder to embed opportunities to seek feedback and evaluate progress at every step of the way.
After the course has been running for a while and completed by a good number of people, you should take time for post training assessments. This means essentially analyzing data from the LMS and drawing hypotheses and learnings.
What are dropout rates and when do people drop out? What feedback have learners left? Were the desired learning outcomes achieved? Reflect back on how the course went, both as an individual reflection and with clients and team. Evaluation and feedback are the doorways to continuous improvement.
If you have the opportunity to gather the whole team together for a retrospective on how the course went, you might find inspiration in templates such as the Team retrospective or the 1-hour online WARP retrospective. For shorter activities that can help you look back and evaluate the program, check out this list of feedback resources from SessionLab’s library of methods.
What feedback do you ask for at the end of training programs? This question is also at the center of a lively discussion in SessionLab’s free community. Join to share notes with other practitioners and add your perspective.
The ADDIE process will give you a great starting point to plot out your work as an instructional designer. It will not give you an instructional strategy or a model of how to organize your course material. If you need some support to decide the order of activities your learners will go through, you can look into other models. Here are two of my favorites:
When designing training sessions, I most often turn directly to this tried-and-true 4-step cycle for experiential learning. This is because I work at the intersection of facilitation and training, where all learning is hands-on and participatory.
Kolb’s learning cycle starts with concrete experiences, such as a training game or learning activity, and follows that with reflective observation, where participants are guided individually or in small groups to draw learnings from what happened directly.
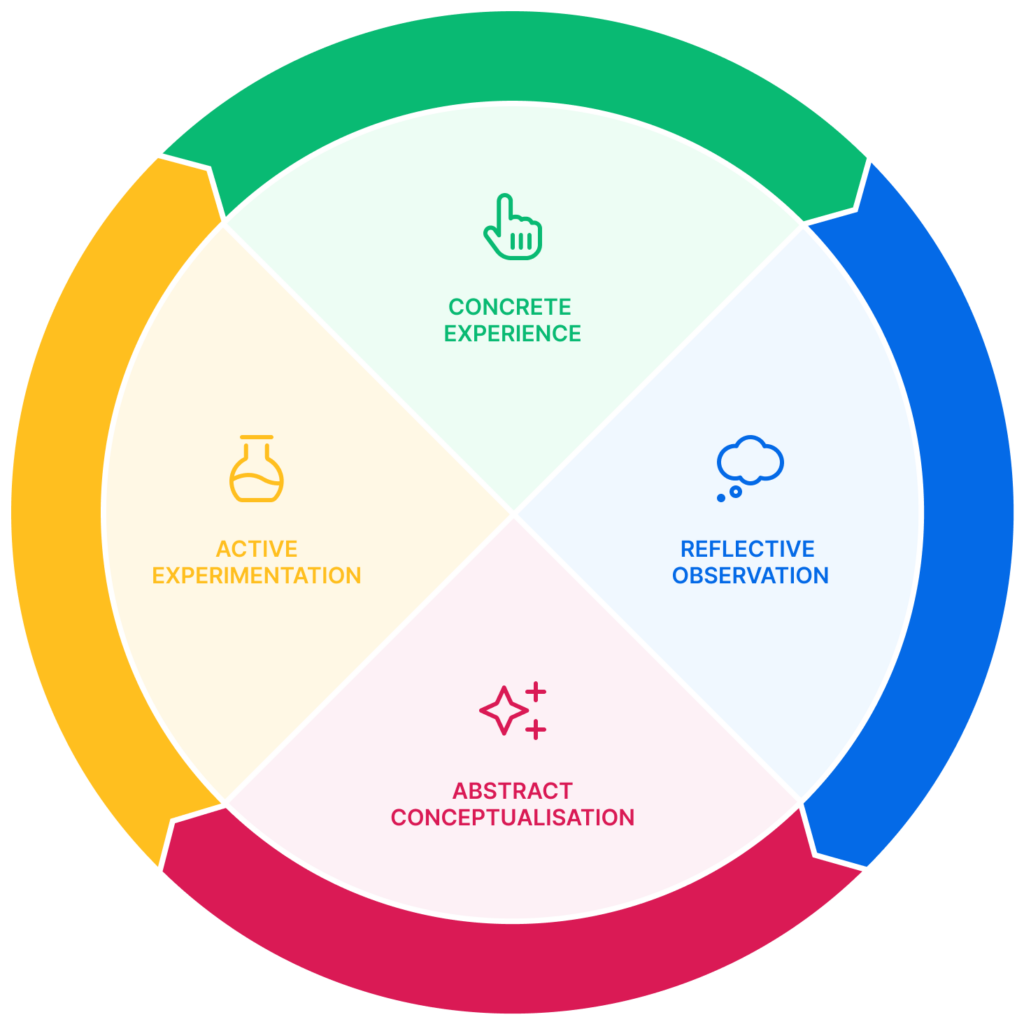
The third step in the cycle is about conceptualizing learning: this is when as a trainer you should offer food for thought, theories, and information. And finally comes active experimentation, which is about applying learnings in the real world, or in simulated real-world situations.
I find it especially important to use Kolb’s learning cycle when training on communication skills, emotional intelligence, or other topics such as facilitators training, or sustainability. It may not be the model you go to for more technical topics where sharing data and information is the core of your training. This is a template that summarizes how to use Kolb’s learning cycle in the classroom.
Another popular theory, building further on the Kolb experiential learning cycle, is the 4MAT model. This model works around the idea that people need to know:
4MAT is a great reminder of how to frame learning content so that it is more relevant and accessible for learners.
For more on this and other tips and theories for designing training events, read our Train the Trainers article. And remember the wisdom behind the ADDIE model: before getting down to developing a course you’ll need to Analyze needs, and pick a high-level design framework that makes sense for your particular situation and learning cohort.
Now that you are familiar with the ADDIE model, you’re equipped to launch into designing your next training course with confidence. In this template we’ve put together information and ideas on how your workflow with the ADDIE model might work. Sections are color-coded to show which parts are more likely to involve individual work and which are team meetings.
You’ll also find a copy of the Needs Analysis Canvas in attachments, and step-by-step instructions on how to organize effective, participatory meetings with your learning design team.
Have you used this template? Let us know how it went in the comments, and best of luck with setting up your next training courses with the ADDIE model!

Deborah Rim Moiso is an Endorsed Facilitator with the IAF – International Association of Facilitators and former co-chair of the Italian IAF Chapter.
She is the author of a manual and deck of cards on facilitation available in Italian (Facilitiamoci!). Deborah has been working with groups since 2009 in the fields of innovation in education, citizen participation, and environmental conflicts.